To encourage the British to eat more healthily, one of the most persistent recommendations has been that we should adopt a more Mediterranean-style diet. People living in (particularly) southern Italy, and Greece have historically lived longer, with lower rates of coronary heart disease.
I'd hazard a guess that the foods most closely associated with a Mediterranean diet would be tomatoes, garlic and olive oil. In fact, it goes wider than that. Most often quoted is Dr Walter Willett of Harvard University's School of Public Health, who described in the 1990s, the emphasis on "abundant plant foods,
fresh fruit as the typical daily dessert, olive oil as the principal source of
fat dairy products (principally cheese and yogurt), and fish and poultry consumed in low to moderate amounts, zero to four eggs consumed weekly, red meat consumed in low amounts, and wine consumed in low to moderate amounts..."
Those abundant plant foods would certainly include tomatoes, sweet and hot peppers, aubergines, courgettes, and beans and pulses, the last often preserved by drying. The fresh produce on this list are of course readily available in shops all the year round, although this loss of seasonality seems to be accompanied by a corresponding loss of flavour. Even in season, we appear to prefer to source our peppers and aubergines from Holland rather than the heart of the Mediterranean itself.
You can of course, try recreating a little corner of Greece or southern France in your own back garden by growing your own Mediterranean vegetables. They may not be ideally suited to the UK climate, but with a little care and by making the most of our comparatively short season, you can grow your own Med produce. And there are plenty of reasons why you should:
- The fruit and veg themselves
are delicious. Your own tomatoes, sweet peppers, etc, will taste better than
those you buy in the shops …
- ... and so they will remind you of
holidays and travels to the Mediterranean region. To me they are always redolent of
summer and sunshine. That sweet tangy burst of tomato juice, the fragrance of
thyme, a squeeze of lemon juice over a salad … it all says summer.
- I think there’s an element of wish
fulfilment in growing fruit and vegetables that should really do better in
warmer climates. We’ve had a succession of mild but wet summers in the last
5-10 years, but if you can raise a crop of aubergines, perhaps you can kid
yourself that our weather’s not so bad after all. There is definitely a sense of
achievement to be had in growing these tender crops.
As a grower, you can make things easier
for yourself in a number of ways. The Secret Garden Club met last Sunday to explore ways in which the cornerstones of the Mediterranean vegetable diet could be adapted to grow on the British patio.
Individual foods are discussed below, but there are some general principles
that hold true for all:
- Choose a suitable variety. There are
varieties of tomato from Siberia, chillies from Poland, aubergines that have
been bred to thrive on northern Italian hillsides rather than Sicilian glades.
Bear this in mind when browsing the nursery catalogues.
- Mediterranean veg like
warmth and light. Give them as much as possible. Don’t expect them to do well on
a north-facing slope. Try a south-facing patio instead; against a sunny wall;
in a greenhouse, even if it’s a soft plastic version.
- Don’t overwater them. They won’t like
being drowned in a wet English summer. This of course is good news as we labour
under a hosepipe ban. But not even tomatoes like too much water: it will make
their skins split.
- Do give them a long season. I sow my
Mediterranean vegetable seeds in February, and I don’t expect aubergines before
September, peppers before August (usually) or tomatoes before August – with a
few exceptions that we’ll come on to later.
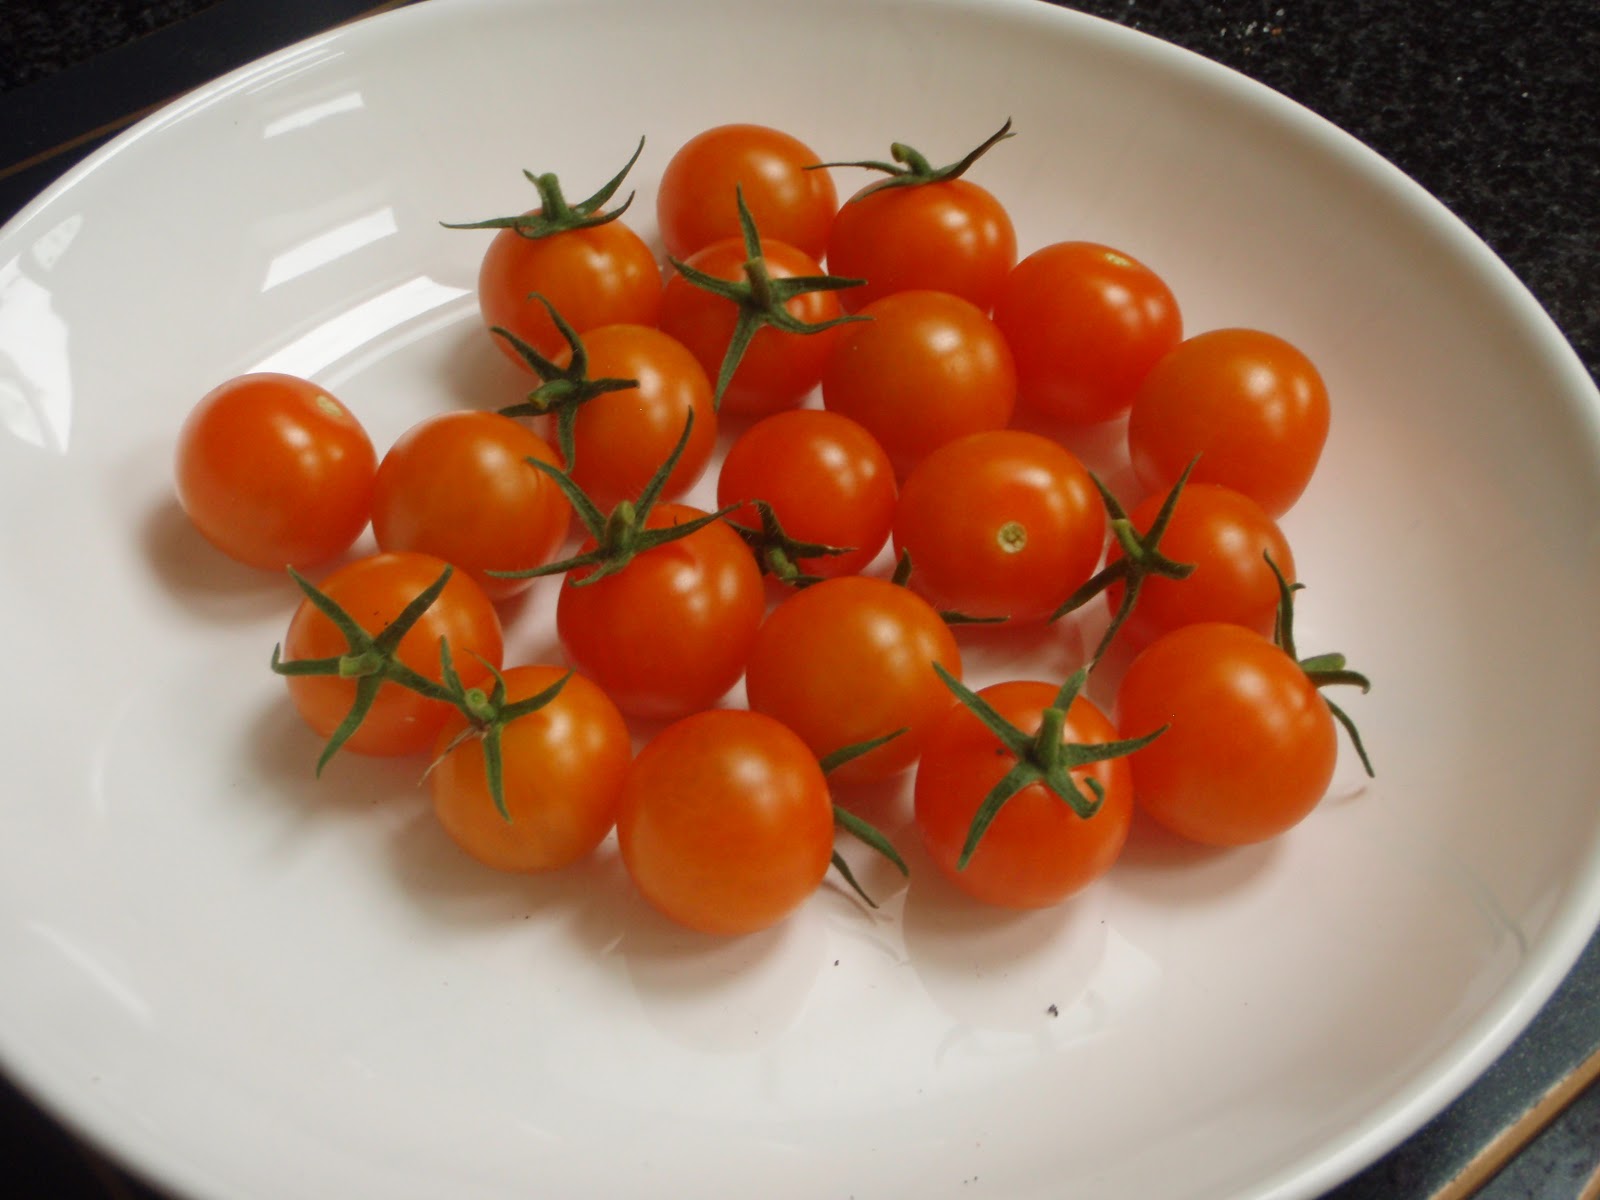
Tomatoes
 |
| Sungold tomatoes, freshly harvested. |
The UK climate is not really conducive to growing tomatoes. Too cool, too humid, too short. Tomatoes are prey to a number of disorders and diseases which are beyond the gardener’s control.So a lot of the work involved in raising tomatoes is done to combat the effects of growing them in a hostile climate.
But every time I eat a really ripe, flavoursome homegrown tomato, it’s worth all the trouble. There is no tomato on sale commercially in the UK that tastes as good as one you have grown yourself.
Tomatoes can be grown in London both in a greenhouse and outdoors; either way you can start sowing seeds as early as the end of January or as late as April. I usually sow a batch in February and a late batch of Sungold tomatoes about now. The plan is to give myself as long a season as possible, and I’ve found from experience that Sungold still taste good when they ripen late – in autumn sun rather than summer sun.
Sow in modules or pots, two seeds to a pot. Place indoors or under glass until the seeds germinate. If you sow in January or February, keep the pots indoors in a consistently warm and light place. By March and April, in an unheated greenhouse should be fine.
Don’t transplant to the final planting place until all danger of frost is past. You can grow tomatoes in pots, in a grow-bag or in the open ground. There are advantages and disadvantages to each, but in practice it will probably depend on the space you have available.
- In pots, you can position the tomatoes in the best place to get the best of the sun. They will need regular watering, perhaps daily in the height of the summer.
- Grow-bags are an easy option: buy the bag, cut a top in the top, plant the tomato and off you go. They can also be positioned where you want them. But staking and supporting the tomatoes can be a problem with grow-bags if they are placed on a patio or a deck, and they will also need very regular watering in summer. Grow-bags are also, to my mind, rather unsightly.
- In the open ground, the tomato plants can send down roots to find moisture. They won’t need as much watering – which is good news in this time of drought – or as much support. However, this assumes that you have a bed free in a sunny sheltered position, otherwise it may be too windy for your plants. You may also get more in the way of soil-borne pests.
Reluctantly, I’m going to recommend growing them indoors. In a conservatory, under a skylight, or in a greenhouse. I say reluctantly because in a good year, outdoor grown and ripened tomatoes taste amazing. But I think we don’t have enough good years. Tomatoes will more reliably ripen under glass, and it is also easier to protect them from blight, the most common problem to affect tomatoes grown in the UK. There's more about blight further down this post.
Use fresh dedicated tomato compost. I think it’s a valuable precaution against soil-borne diseases. You can always re-use the compost as a mulch on non-tomato, (and non-potato) crops afterwards.
Water regularly. Irregular watering will lead to blossom end rot. A good soak once a week, plus feeding once the fruits start forming should keep the plants happy.
When watering, don’t splash the leaves. Deliver water directly to the roots. One very good way to feed tomatoes, whether they’re in a pot, a grow-bag or in the ground, is to lop the bottom off a plastic water bottle, remove the cap and push it, cap end down, into the soil next to the plant.
Pinch out side shoots. If you have what is called an indeterminate tomato plant, that is, one that grows tall and straggly, you are advised to remove the shoots that grow between the main stem and the leaf. If you don’t, you’ll get a very vigorous green plant but not many fruits.
As the trusses, ie, the stems bearing fruit, form, remove the leaves around them to let the air circulate.
In any case, shop around, in nurseries or online, to explore the wide variety of tomatoes available. The plants sold in garden centres, such as Alicante, Tumbling Tom, Gardeners Delight and Moneymaker, tend to be those that can withstand manhandling, rather than those that taste best.
You can buy cherry tomatoes in brown, red, yellow or green, or striped, or beefsteak tomatoes, in small bushes or huge vine-like cordons.
At some stage during the summer, your tomatoes will almost certainly get blight. Greenhouse tomatoes may be protected to a certain extent, but all tomatoes grown outdoors in the UK will get blight sooner or later.
Blight is a fungal organism. It lives in the soil and is activated on cool humid days, typically in July. The spores are then carried on the air. Blight can sweep through an allotment, or an area where lots of plants are grown close together, like wildfire. So one preventative measure is to grow your tomatoes a considerable distance away from other tomatoes.
From July onwards, check your tomato plants regularly. The first signs of blight will be a blackening of the edges of the leaves, so that they look almost sooty. Remove any leaves that look like this immediately and ideally burn them. Don’t put them in the compost.The other tell-tale sign of blight is black patches on the stems. Again, try to remove these as soon as you see them – difficult if it’s the main stem.
If the fruits are near to maturity, you can try removing them and ripening them on a sunny windowsill indoors. Heart-breakingly, green fruits that look OK often develop brown blight patches and rot while ripening.
If you grow a very early-ripening variety such as Red Alert, First In The Field or Glacier, you should get fruits before July which is usually the earliest time for blight to appear.
One very interesting way to stack the odds against blight and other disorders in your favour is to consider grafted tomato plants. This is a plant where the fruiting plant has been grafted on to a disease-resistant root or rootstock. You get the disease resistance from the roots, plus the good fruiting characteristics of the top half of the plant. Grafted plants are becoming available in the larger garden centres and nurseries but are considerably more expensive.
You can also try grafting your own tomato plants - we included a grafting session in Sunday's Secret Garden Club and guests were surprised by how uncomplicated an operation it is. See here for a step by step guide to grafting tomatoes.
Peppers
 |
| Caldero peppers, a hot-but-not-too-hot variety. |
Sweet peppers and hot peppers, or
chillies, are varieties of the same species, Capsicum annuum. Like many other vegetables that we
think of as Mediterranean, peppers came to Europe from the Americas.
The heat in chilli peppers derives from a substance called capsaicin (and related compounds), and the heat of a particular variety can be measured in Scoville units.
- A sweet red pepper has a Scoville rating
of 0.
- A jalapeno, quite a mild chilli, is
between 2,500 and 5,000.
- Habaneros, some of the hottest peppers,
are around 300,000 Scoville Heat
Units.
- Recently, there has been much interest
in developing the ‘hottest’ chilli, and giving it a suitably macho name.
According to the Guinness Book of Records, the hottest chilli in 2011 was the
Trinidad Scorpion Butch T pepper, at nearly 1.5m SHU.
Peppers used in Mediterranean dishes are either sweet or mild to moderately hot. As well as flavour, and colour, there’s
another good reason to grow your own peppers: they are easy to grow.
Indeed, if you have somewhere light and
consistently warm indoors – under a kitchen skylight for example – you can
bring them in at the end of summer and grow them as perennials. Chilli plants seem to do better over-winter than sweet peppers.
However, when you start off sowing
pepper seeds, there are some things to consider.
- Do shop around: check the catalogues
and online. There are 100s of sweet and chilli varieties available.
- The seeds will need to be sown early in
the year, in January or February.
- They will also need heat. If you have a
heated propagator, that’s ideal. If not, then identify a sunny warm windowsill
where the heat will be fairly consistent.You can start your peppers off in
seed modules to save space, or in 3-inch pots, which will save you one
potting-on stage later on.
- Fill the module or pot with seed
compost, soak it well and let the water drain.
- Sow two seeds per module on top of the
compost, then sprinkle with dry compost so
that the seeds are only just covered.
- Cover the pots – with the clear
propagator lid or a polythene bag attached firmly to the pot with an elastic
band.
- Then leave them be. They should
germinate after 10-14 days, after which you can remove the covering and the
bottom heat if you used a propagator.
If you started them in modules, they
will probably outgrow them in about a month and will need to be transferred to
a small pot. Don’t pot on until they have four true leaves.
They will also probably be looking a
bit straggly and long-stemmed from being raised indoors. This is OK: when you
put them in a pot, bury the stems in deep to make them sturdy. The potting-on stage is also the time to discard the weaker seedling of the two sown together.
If you’re growing more than one
variety, be meticulous about labelling them. All peppers, sweet or hot, look
exactly the same at this stage.
Your peppers will need to stay inside
until the risk of frost is over. Even here in London, I’d be cautious and say
that’s the end of April. Once the days are warm – and especially
when the nights are no longer truly cold, generally in around mid-May – the
peppers can be transferred to their final pots and moved outside. Or you can
grow them in the open ground. Either way, you need to find somewhere sunny, and
not too windy and they should do well.
They will need to be hardened off
before going outside permanently. Hardening off just means getting the
plant accustomed to being outdoors gradually, over a period of a week or so. Indoors there’s no wind, and much
more gradual fluctuations of temperature, so for a plant, going outdoors all at
once will put it in a state of shock.
Most plants will recover but it will
check their growth. Hardening off properly makes your plants much sturdier.
As the plants grow, they will probably
need some support. They’re not climbers, but they will appreciate the main stem
being tied to a stake, as many varieties will grow to about 60-75cm tall.
They will, of course, need watering and
this is topic of some concern in the current drought. The good news is that they don’t need
masses of water. Sweet peppers need more than hot peppers. Peppers grown in the
open ground will need less water than those in pots.
Water them when they look thirsty – the
leaves may start to look a little limp or lose their gloss.
Your peppers will self-pollinate. You
should see the delicate white flowers in late May and into June and July. The
flowers point down like an umbrella and as the blooms fade, you’ll see the
green fruit beginning to swell behind them.
You can start picking and using peppers
when they are green. However, with sweet peppers you won’t get the full flavour
or the benefit of the rainbow colours. Where possible I think you should let
the fruits mature.
Green chilli peppers won’t be as hot as the ripe versions,
whatever the variety. Chillies also develop heat as the summer wears on, so that
an early red chilli picked in August will be milder than one from the same bush
picked in October.
Harvest your peppers before the first
frost – which could be as early as October, so keep an eye on weather
forecasts. If you’re overwintering your plants, bring them indoors in October
as the nights get colder.
The one other thing to do with your
peppers to keep checking them for pests. They are not prone to pests and
disorders and thankfully don’t seem too attractive to slugs. If they are in a greenhouse, there are
the usual greenhouse pests to look out for: red spider mite and whitefly. Look
for a sticky residue on the leaves, or a fine white webbing between the leaves
and stems.
Outdoors, pepper plants do seem to be
something of an aphid magnet. These look like tiny green discs on the underside
of leaves and it’s worth checking regularly for them. Again, they leave a
sticky sheen on leaves and stems; also look for tiny white flakes on the
surrounding soil.
Now, my bespoke solution for aphids and
red spider mite, etc, on mature plants (not seedlings) has always been to blast
them with water from the jet nozzle on the garden hose. They either get blasted off the plant
altogether, or they drown in the deluge. I’m not sure this method is allowable
during a hosepipe ban unfortunately.
The classic anti-aphid treatment is to
spray with mild soapy water, and I stress mild. Neat washing-up liquid is more
likely to kill the plant off.
In either case, make sure the plant is
clean before bringing it into the house for winter. I’ve had many aphid
outbreaks after bringing pepper plants into the cosy warmth of the house.
Aubergines
 |
| The white aubergine variety Tango is firm-fleshed and sweet. |
Aubergines are a little trickier in the
British climate. While I’m happy to grow peppers outside, I prefer to keep aubergines
under cover. Even in high summer, I’ll have them in a soft plastic greenhouse
with the door open.
And this makes them prey to greenhouse
pests, especially aphids. I do quite a lot of spraying and wiping with the
aubergines.
Sowing and raising them is very similar
to peppers. Start them off in February in the warm, sowing two seeds to a pot
or seed module and keep moist without soaking them.
Once they have true leaves they can
move to a pot from the seed module, but keep them indoors until after all
danger of frost has passed, and harden them off before planting out in big
pots, in a grow bag, or if your garden is very sheltered, a sunny patch of open
ground. Aubergine plants like reasonably high
humidity, so the plants can be sprayed with a mister regularly to keep moisture
levels up.
This is another plant that likes to be
well watered when the fruits are forming in July and August. I also feed them
at the same time as feeding the tomatoes. Here, being forced to use a watering
can could be a good thing. Aubergines are so leafy that a lot of water just
runs off the leaves on to the ground if sprayed with a hose.
The fruits should be ready to harvest
in September and October. Make sure you’ve picked them all before the first
frost, which will kill off the plant.
Courgettes
 |
| Courgette Romanesco ripening in the sun. |
It seems perverse to talk about
courgettes as a Mediterranean vegetable and not pumpkins and squash, but while
there are lots of recognisably Med things to do with courgettes, pumpkins seem
to belong to a more northern European and American tradition.
Courgettes, however, go in ratatouille,
or are simply stewed with tomatoes, or best of all, the flowers are stuffed and
then deep-fried, which always seems to me to be a very luxurious dish even though it’s
almost a free by-product of the plant.
Courgettes are fast growers. You don’t
need to think about sowing them until April, and since the plants and fruit
won’t really grow until it’s properly warm you won’t gain much by sowing
earlier. I have tried growing them early under a cloche, but the fruit was very
small and had a tendency to shrivel before it matured.
Courgettes have big seeds and would
outgrow a seed module very quickly, so start them off indoors in 3 inch pots.
Nearly all gardening books and experts
say you must sow them on edge, or on their side, to reduce the chance of the
seeds rotting. I’ve never had any problems with germination or
rotting, despite being lazy and simply laying the seeds on the soil. However, in the interest of accuracy
what it means is pushing the seeds into the soil vertically, pointed end first.
Sow two seeds to a pot, and remove the weaker
seedling once they’ve germinated and produced true leaves. Incidentally, whenever you remove the weaker seedling, don’t yank it out. You may damage the root
structure of the other, stronger seedling. I snip out the seedling to be
thinned, at soil level, with a pair of manicure scissors.
Courgettes – and squash – are greedy
plants. They like lots and lots of feeding. Many books suggest growing them on
the compost heap with good reason. If the top of your compost heap looks at all plantable (rather
than being a pile of eggshells, avocado skins and teabags), this is an
excellent space-saving idea. Transfer them to the compost heap, or open ground, once any
danger of frost is over and the nights are no longer cold. You might want to give the plants a
little slug protection: put a copper collar round the plants or scatter a few
slug pellets.
You can pick the male flowers to stuff
and eat. Pick the fruits when they’re small. Leaving them to grow into marrows
will stop the plant producing any other courgettes, so only let them grow on into marrows
if you really want marrows.
At the height of summer you’ll find you
have a glut of courgettes. Don’t despair: grated courgettes can ‘disappear’ into
casseroles, spaghetti bolognaise, soups, and they also make lovely fritters. There is a recipe for a chocolate cake here on my Gourmet Gardening blog which incorporates two grated courgettes - the same principle as the carrots in carrot cake.
Herbs
Many Mediterranean dishes are
unthinkable without the accompanying herbs to flavour them. Basil, rosemary,
thyme, oregano and bay are all herbs we associate with the warmth and sunshine
of the Med.
Herbs are probably the easiest of plants
to raise, especially if you don’t have much space. They will do well in pots or even a window box on the balcony.
Rosemary, thyme and oregano are similar
in that in the wild they flourish in poor, even stony, soil. So don’t treat
them too kindly. They will survive cold, but not prolonged wet.
Basil, on the other hand is much leafier, and likes a rich, moist soil. I prefer to grow basil indoors where it can be cossetted and produce lush emerald green leaves.
There's more on Mediterranean herbs and herbs in general elsewhere on the Secret Garden blog.